
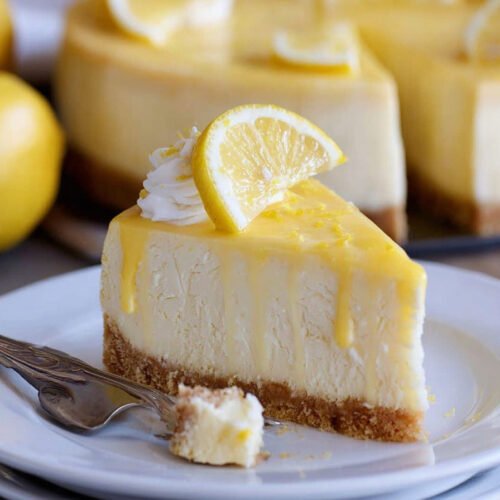
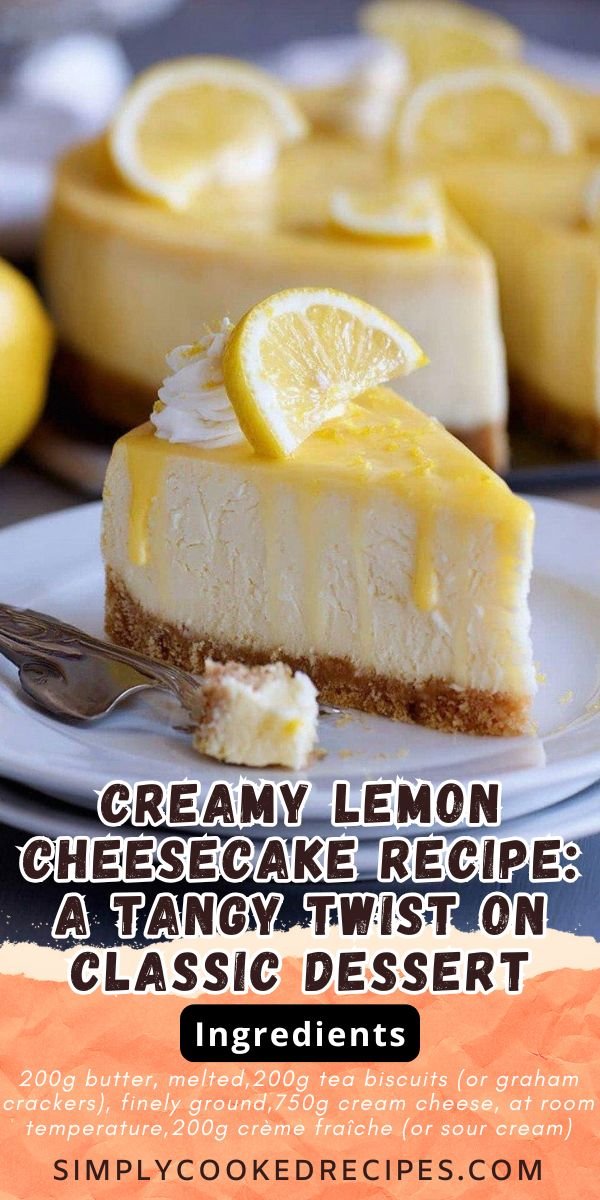
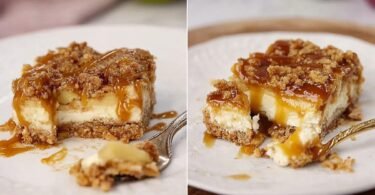
I’ve been obsessing over this cheese cake recipe lately, and let me tell you, it’s the kind of dessert that makes you look like a baking genius without breaking a sweat. You know those lemon desserts that just hit differently? This is one of them. My aunt used to make something similar when I was growing up, and I’ve spent years trying to recreate that magic. What makes this creamy cheesecake stand out is how the tangy lemon plays with the rich, velvety filling. It’s not too sweet, not too tart, just perfectly balanced. I love making this lemon cheesecake recipe for dinner parties because it always gets people asking for seconds. The white chocolate topping? That was a happy accident from one of my kitchen experiments that I’ll never stop doing. Whether you’re searching for best dessert recipes to impress your in-laws or just want a solid cheesecake with lemon for Sunday brunch, this citrus dessert recipe delivers every single time. The crust is buttery and crisp, the filling is smooth like silk, and that lemon curd swirl in the middle? Pure heaven. Trust me, once you make this, it’ll become your go-to show-stopping dessert.
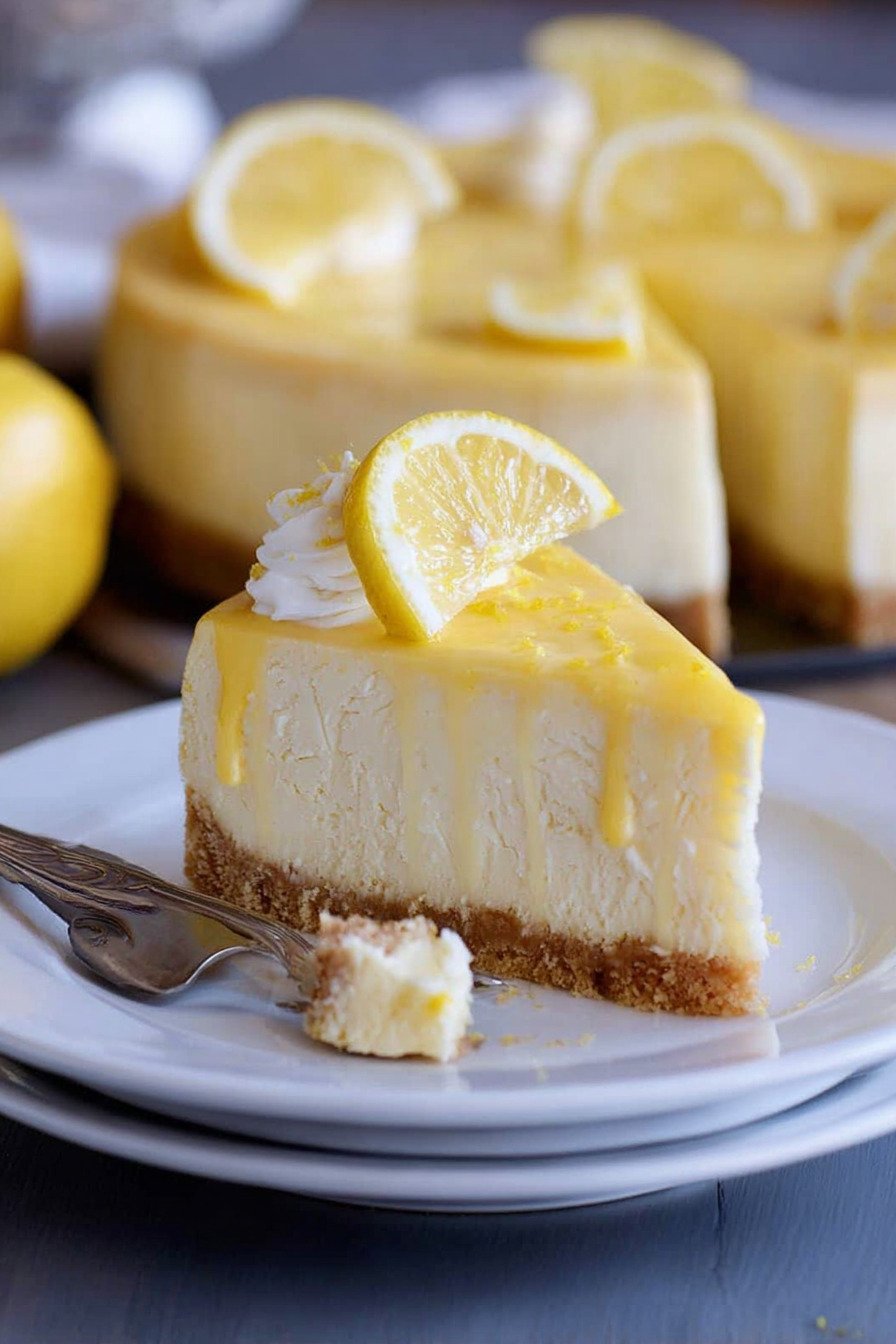
Table of Contents
- 1) Key Takeaways
- 2) Easy Lemon Cheesecake Recipe
- 3) Ingredients for Lemon Cheesecake
- 4) How to Make Lemon Cheesecake
- 5) Tips for Making Lemon Cheesecake
- 6) Making Lemon Cheesecake Ahead of Time
- 7) Storing Leftover Lemon Cheesecake
- 8) Try these Dessert next!
- 9) Lemon Cheesecake
- 10) Nutrition
1) Key Takeaways
- What makes this cheese cake recipe different from traditional cheesecakes?
- Can you make lemon cheesecake without cracking the top?
- What’s the secret to getting a smooth, creamy cheesecake filling?
- How long does lemon cheesecake need to chill before serving?
2) Easy Lemon Cheesecake Recipe
Listen, I get it. The thought of making a cheese cake recipe from scratch can be scary. You’re worried about cracks, worried about the texture, worried about messing up something that takes hours to make. But here’s the thing – this lemon cheesecake is actually way more forgiving than you’d think.
I started making cheesecakes about five years ago when my neighbor brought one to a potluck and I couldn’t stop thinking about it for weeks. She finally gave me her recipe, and I’ve been tweaking it ever since. What I love most about this cheese cake recipe is that it doesn’t require any fancy equipment or complicated techniques. You don’t need a water bath (thank goodness), you don’t need special pans, and you definitely don’t need culinary school training.
The lemon gives it this bright, zippy flavor that cuts through all that richness. My kids actually prefer this over chocolate cake now, which is saying something. The white chocolate topping adds just enough sweetness without being cloying, and that lemon curd swirl? It looks impressive but takes literally two minutes to do. I’ve made this for birthday parties, holiday dinners, and random Tuesday nights when I needed something special. It works every single time.
What sets this recipe apart is the slow, low-temperature baking method. You’re not rushing things here. The cheesecake bakes gently at a lower temp, which means it stays creamy and smooth instead of turning into a rubbery mess. And that hour of cooling in the oven with the door closed? That’s your insurance policy against cracks. I learned that trick the hard way after my first three attempts came out looking like the Grand Canyon.
The best part? Most of the work is hands-off. You mix, you pour, you bake, you wait. That’s it. No constant checking, no complicated steps, no stress. This is the kind of dessert that makes you look like you spent all day in the kitchen when really you spent maybe 30 minutes of actual work. The rest is just patience, which honestly might be the hardest ingredient to find sometimes.
I’ve taught this recipe to at least a dozen friends at this point, and every single one has reported back with success stories. One friend made it for her mother-in-law (brave move) and apparently earned major points. Another brings it to every office party and has people begging for the recipe. It’s become my signature dessert, the thing people ask me to bring to gatherings. And I’m totally okay with that reputation.
3) Ingredients for Lemon Cheesecake
Butter: You’ll need 200g of melted butter for the crust. I use unsalted so I can control the salt level, but salted works fine too. Just melt it in the microwave or on the stove – no need to get fancy here. The butter binds the biscuit crumbs together and gives that crust its rich, buttery flavor. Don’t skimp on this part. Cheap butter makes a cheap-tasting crust.
Tea Biscuits or Graham Crackers: I use tea biscuits when I can find them, but graham crackers are the American go-to and work perfectly. You need 200g, finely ground. I just throw them in my food processor and pulse until they look like coarse sand. If you don’t have a food processor, put them in a zip-top bag and go to town with a rolling pin. Great stress relief, by the way.
Cream Cheese: This is the star of any cheese cake recipe. You need 750g, and it absolutely must be at room temperature. I can’t stress this enough. Cold cream cheese will leave you with lumps no matter how long you beat it. Take it out of the fridge at least an hour before you start baking. Some people leave it out overnight, which works too. Just don’t try to soften it in the microwave unless you want a melted mess.
Crème Fraîche: The 200g of crème fraîche adds this beautiful tangy richness that regular cream doesn’t provide. If you can’t find it, sour cream is a solid substitute. I’ve used both many times. The crème fraîche has a slightly milder flavor and smoother texture, but honestly, most people can’t tell the difference in the final product. Use what you can find or what’s on sale.
Lemon Zest and Juice: Fresh lemon is non-negotiable here. You need about 3g of zest (roughly one lemon’s worth) and 20ml of juice. The zest gives you those aromatic oils that make the whole cheesecake smell amazing, and the juice provides that bright, tart flavor. I’ve tried using bottled lemon juice before. Don’t do it. It tastes weird and artificial. Just buy a couple of fresh lemons and call it a day.
Granulated Sugar: The 125g of sugar might seem modest for a dessert this size, but that’s intentional. The lemon curd and white chocolate topping add sweetness, so we don’t want the base to be overly sweet. This amount gives you just enough to balance the tanginess of the cream cheese and lemon without turning it into a sugar bomb.
Cornstarch: This 35g of cornstarch is your secret weapon for a super smooth, creamy texture. It helps stabilize the filling so it sets properly without becoming too dense or eggy. I used to skip this ingredient thinking it was optional. Big mistake. The texture was completely different, almost custardy in a bad way.
Eggs: Three large eggs bind everything together and give the cheesecake its structure. Make sure they’re at room temperature too. Cold eggs don’t incorporate as smoothly into the batter. I usually just put mine in a bowl of warm water for five minutes while I’m prepping everything else. Easy fix.
Lemon Curd: You’ll need 125g for the swirl inside the cheesecake and another 35g for the topping. I buy mine at the store because making it from scratch is more work than I’m willing to do for this recipe. Find a good quality brand – it makes a difference. The lemon curd adds pockets of intense citrus flavor throughout the cheesecake. It’s what makes people go “wait, what is that amazing tangy part?”
White Chocolate: The 100g of chopped white chocolate for the topping needs to be actual chocolate, not white chocolate chips. Chips have stabilizers that prevent them from melting smoothly. Get a bar of decent white chocolate and chop it yourself. You want pieces roughly the size of chocolate chips. This topping is sweet and creamy and provides a beautiful contrast to the tangy cheesecake underneath.
Heavy Cream: Just 40ml to make the white chocolate ganache. Heat it until it’s just about to boil, then pour it over your chopped chocolate. The heat melts the chocolate and creates this silky, pourable topping. Some people use a double boiler for this step, but I’m way too impatient for that. The microwave method works perfectly fine.
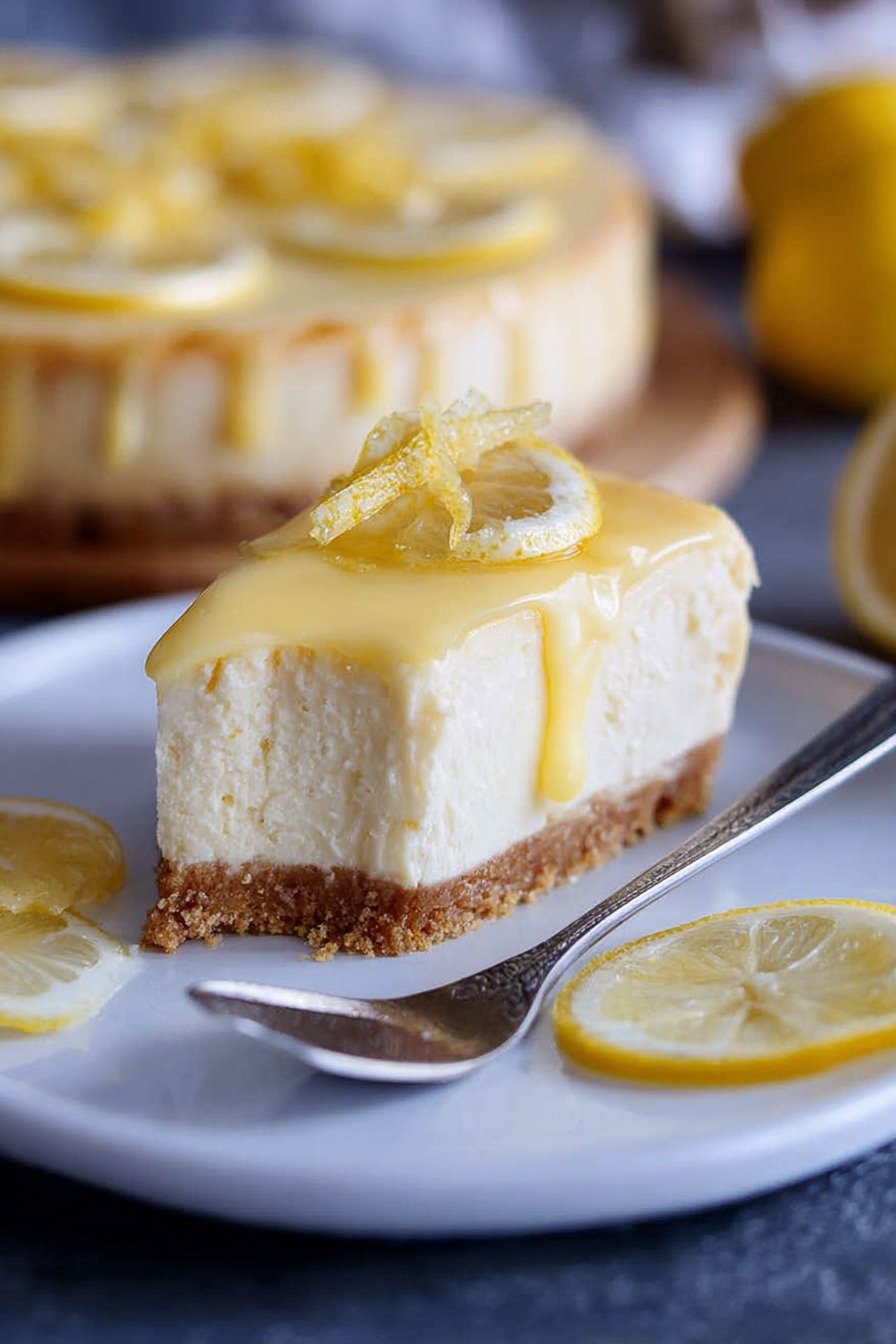
Garnishes: Whipped cream, fresh lemon slices, and mint leaves are totally optional but make the presentation go from “homemade dessert” to “fancy bakery creation.” I always do the garnishes when I’m serving this to guests. For family dinner? Maybe just some whipped cream if I’m feeling motivated. The mint adds a nice fresh aroma when you take that first bite.
4) How to Make Lemon Cheesecake
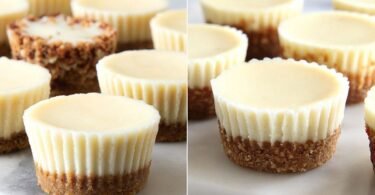
Step 1. Start with your crust by mixing that melted butter into your finely ground biscuits or graham crackers. You want it to look like wet sand – clumpy enough to hold together when you squeeze it, but not so wet that it’s soupy. Press this mixture firmly into the bottom of your 24cm springform pan. And I mean firmly. Use the bottom of a measuring cup or glass to really pack it down. A loose crust will crumble apart when you try to slice the cheesecake later, and nobody wants that mess. Once it’s packed tight, stick the whole pan in the fridge to chill.
Step 2. Now for the fun part. In your largest mixing bowl, beat together the room temperature cream cheese, crème fraîche, lemon zest, lemon juice, sugar, and cornstarch. I use a hand mixer for this, but you can use a stand mixer if you have one. Beat it until it’s completely smooth with zero lumps. This usually takes about two minutes. Scrape down the sides of the bowl a few times to make sure everything gets incorporated. This step is where a lot of people mess up by using cold cream cheese. Don’t be that person.
Step 3. Time to add the eggs. Crack them into a small bowl first (trust me on this – you don’t want shell pieces in your batter). Add them one at a time to your cream cheese mixture, gently folding each one in with a spatula. Notice I said fold, not beat. You don’t want to incorporate too much air here or you’ll end up with cracks. Just fold gently until each egg is mixed in, then add the next one. The batter should be smooth and creamy, with a beautiful pale yellow color from the lemon.
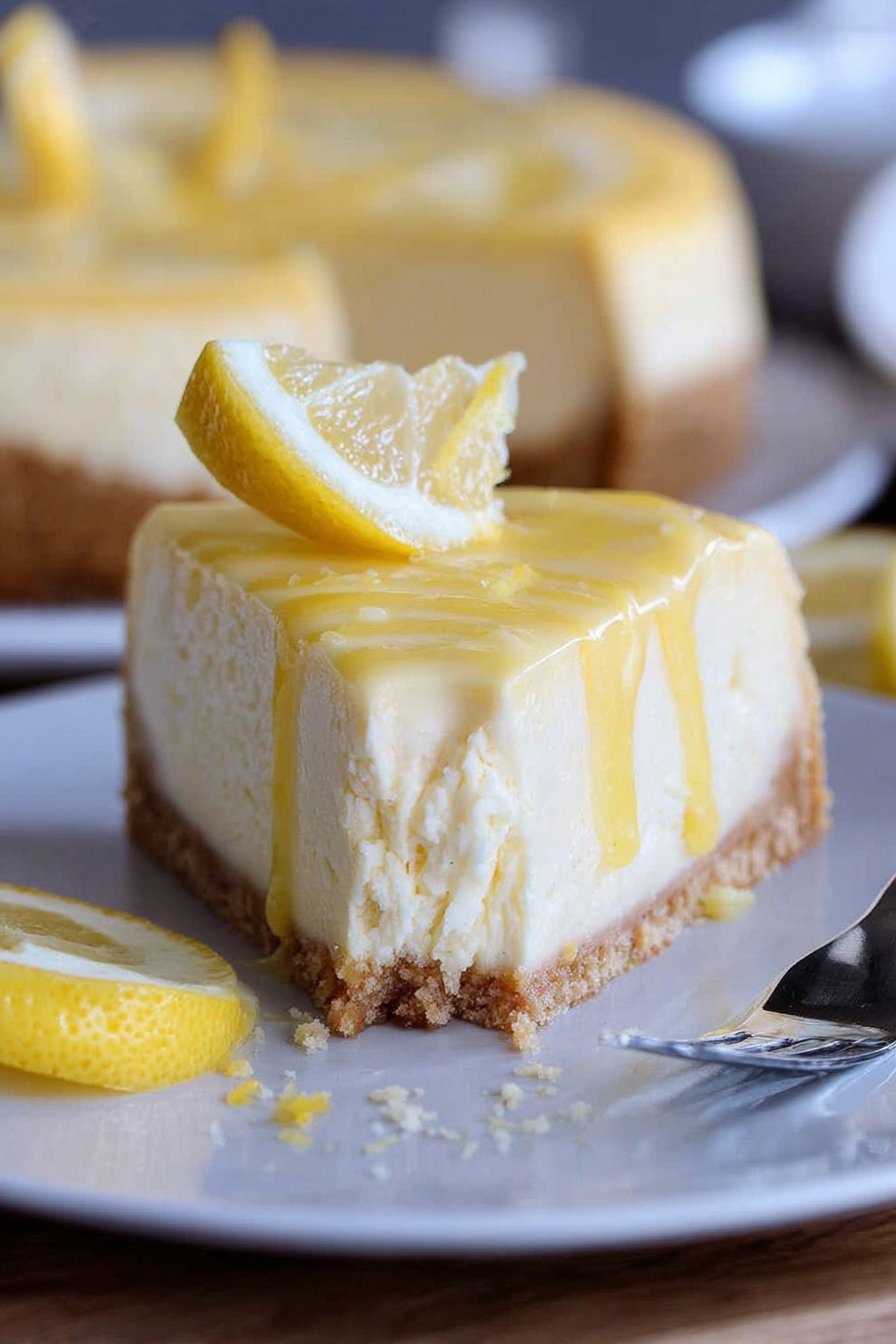
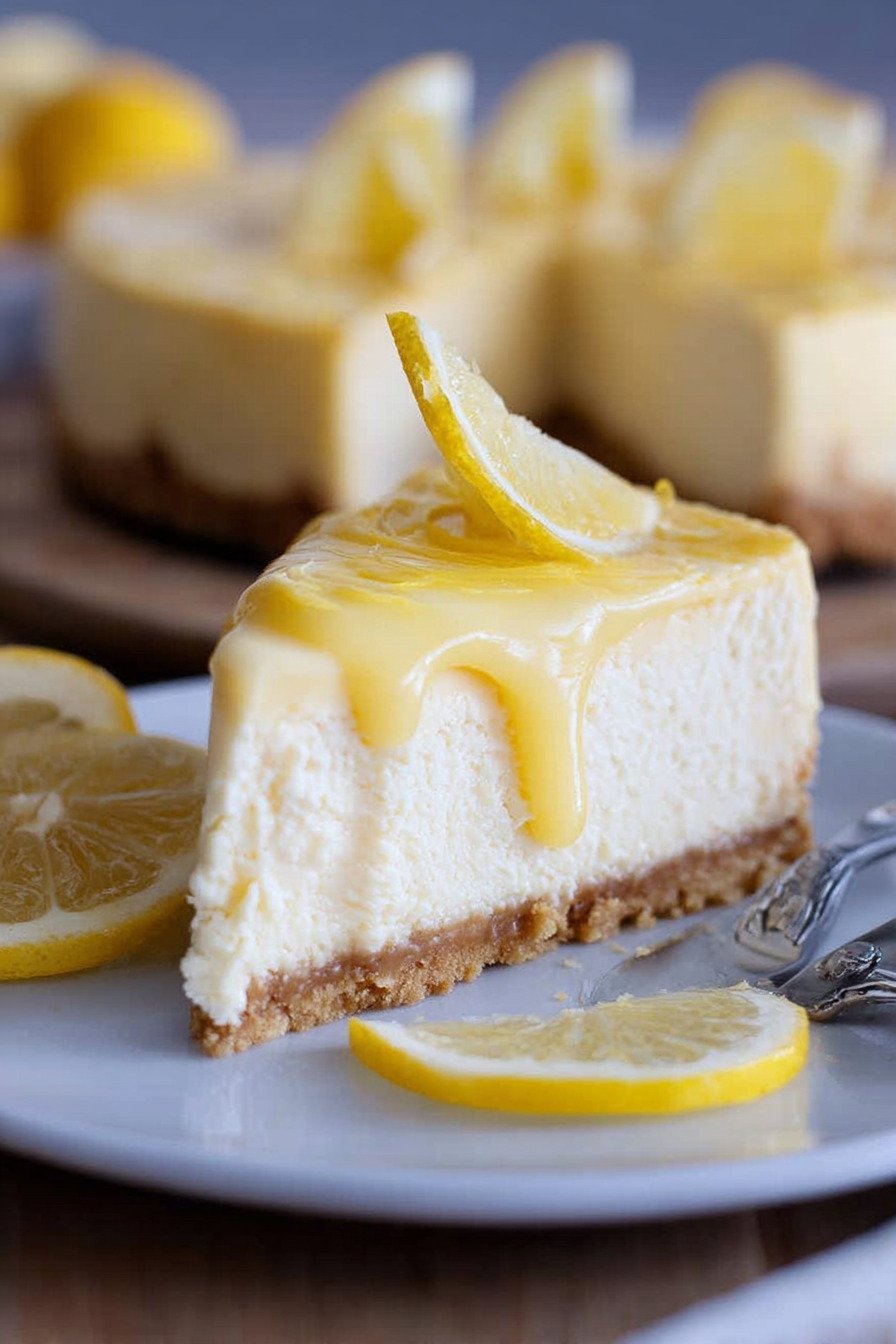
Step 4. Pull your crust out of the fridge. Pour half of the cheesecake filling over it, spreading it evenly. Now grab that lemon curd and drop spoonfuls of it randomly over the surface. Take a butter knife or a skewer and swirl it through the filling to create those pretty marble patterns. You’re not mixing it in completely – you want distinct swirls that’ll show up when you slice the cheesecake. Pour the remaining filling on top and smooth the surface with a spatula. Some of those lemon curd swirls will peek through, and that’s perfect.
Step 5. Get your oven preheated to 125°C (that’s 257°F). I know it seems like a low temperature, but that’s the whole point. Slow and low prevents cracks and keeps the texture creamy. Slide your cheesecake into the oven and set a timer for 60 minutes. When the timer goes off, check it. The edges should be set, but the center should still jiggle slightly when you gently shake the pan. If it’s still really wobbly, give it another 5 minutes. When it’s ready, turn off the oven but leave the cheesecake inside with the door closed for a full hour. This gradual cooling is your crack insurance.
Step 6. While the cheesecake is doing its oven cool-down, make your white chocolate topping. Heat the heavy cream in the microwave or on the stove until it’s just starting to bubble around the edges. Pour it over your chopped white chocolate in a bowl and let it sit for about a minute. Then stir it smooth. The chocolate will melt into the cream and create this gorgeous, glossy ganache. Stir in that 35g of lemon curd. The ganache should be pourable but not too thin. Let it cool slightly while the cheesecake finishes cooling.
Step 7. When your hour is up, take the cheesecake out of the oven. It should be completely set now, though it might still look slightly jiggly in the very center. That’s fine – it’ll firm up as it cools and chills. Let it cool to room temperature on the counter, which takes about another hour. Then pour or spread your white chocolate topping over the surface. You can keep it smooth or create more decorative swirls with extra lemon curd if you want to get fancy. Cover the whole thing and refrigerate for at least 4 hours, but overnight is way better.
Step 8. When you’re ready to serve, run a thin knife around the edge of the pan before releasing the springform. This prevents the sides from sticking and potentially tearing your beautiful cheesecake. For clean slices, dip your knife in hot water and wipe it dry between each cut. Garnish with whipped cream, thin lemon slices, and fresh mint leaves. Stand back and accept the compliments. You’ve earned them.
5) Tips for Making Lemon Cheesecake
Room temperature ingredients are your best friend when making this cheese cake recipe. I know I keep harping on this, but it really does matter. Cold cream cheese creates lumps, and cold eggs don’t blend smoothly into the batter. Set everything out on your counter an hour before you start baking. If you forget and your cream cheese is still cold, you can cut it into cubes and microwave it in short 10-second bursts, stirring between each one. Just don’t let it get melty or you’ll mess up the texture.
Don’t over-mix the batter once you add the eggs. This is probably the second most common mistake I see people make (after the cold cream cheese thing). When you beat too much air into the batter, it rises in the oven and then falls as it cools, which creates cracks. That’s why we fold the eggs in gently with a spatula instead of beating them in with the mixer. It takes a little longer, but it’s worth it for that smooth, crack-free top.
The jiggle test is your friend. When you check the cheesecake at the 60-minute mark, give the pan a very gentle shake. The edges should be completely set and firm, but the center can still have a slight wobble – about the size of a quarter. If the whole thing jiggles like jello, it needs more time. If nothing moves at all, you might have overbaked it slightly, but it’ll probably still be fine. Trust the jiggle.
Let it cool gradually in the oven. I can’t stress this enough. That hour of cooling with the oven turned off is what prevents cracks. Sudden temperature changes make cheesecakes crack like crazy. Opening the oven door too early lets cold air rush in and creates those cracks you’re trying to avoid. I know it’s tempting to peek, but resist the urge. Set a timer and walk away. Go watch TV, do some dishes, whatever. Just leave it alone.
Use a springform pan and line the bottom with parchment paper. This makes removing the cheesecake so much easier. I tried using a regular cake pan once thinking I could just slice it and serve it from the pan. What a disaster. The springform lets you release the sides cleanly, and the parchment prevents the bottom crust from sticking. Cut a circle of parchment that fits the bottom of your pan, and you’ll thank yourself later.
Chill overnight if you possibly can. I know the recipe says at least 4 hours, and that’s technically true. But this lemon desserts recipe tastes so much better after a full night in the fridge. The flavors meld together, the texture firms up perfectly, and it slices much more cleanly. If you’re making this for an event, bake it the day before. Future you will be grateful.
Keep the croutons… wait, wrong recipe. But seriously, if you’re adding any crunchy toppings or garnishes, wait until just before serving. The moisture from the cheesecake will make them soggy if they sit too long. I learned this lesson with some candied lemon peel I made once. By the time we served the cheesecake, the peel had turned into a sticky, sad mess.
6) Making Lemon Cheesecake Ahead of Time
This cheese cake recipe is actually perfect for making ahead, which is one of my favorite things about it. Cheesecake is one of those rare desserts that gets better with time. The flavors develop, the texture becomes even more creamy, and you get to cross “make dessert” off your to-do list days before you actually need it. I usually make mine two days before I plan to serve it, which gives me one less thing to stress about on the actual day of the event.
You can make the whole thing, topping and all, up to three days in advance. Just keep it covered in the fridge. I use plastic wrap pressed directly onto the surface for the first day or two (gently, so you don’t mess up the pretty white chocolate topping), then switch to the springform pan’s lid or a cake dome once I’ve added the garnishes. The cheesecake stays fresh and delicious, and honestly, I think the lemon flavor gets even better as it sits.
If you want to make it even further ahead, you can freeze the cheesecake without the garnishes. Let it freeze solid (this takes about 4 hours), then wrap it really well in plastic wrap and aluminum foil. It’ll keep in the freezer for up to a month. Thaw it overnight in the fridge before adding the white chocolate topping and garnishes. I’ve done this several times when I knew I’d be too busy to bake close to an event. The texture is exactly the same as fresh.
One thing I don’t recommend is adding the whipped cream, lemon slices, or mint garnishes more than a few hours before serving. The whipped cream can weep and get watery, the lemon slices can dry out, and the mint will wilt. Add those finishing touches right before you’re ready to serve for the best presentation. Everything else can be done well in advance.
If you’re transporting this cheesecake somewhere, keep it in the springform pan until you get there. It travels much better that way. Put the whole pan in a large container or box to keep it stable, and keep it cold with ice packs if you’re driving more than 20 minutes. Release the sides and do your final garnishing at your destination. I learned this the hard way when I tried to transport a fully garnished, plated cheesecake to my sister’s house. It looked like it had been through a war by the time we arrived.
7) Storing Leftover Lemon Cheesecake
Leftover cheesecake (if such a thing exists in your house) stores beautifully in the fridge. Just cover it well with plastic wrap or put it in an airtight container. It’ll stay fresh for up to five days, though I’ve never had it last that long. The texture stays creamy, and the flavors stay bright. Some people say desserts with citrus don’t keep well, but I’ve never had that problem with this recipe.
The white chocolate topping holds up great in the fridge too. It doesn’t get hard or weird like some chocolate toppings can. It stays smooth and creamy, which is one of the reasons I love using white chocolate for this. If your lemon slices or mint garnishes start looking sad after a day or two, just remove them and add fresh ones when you’re ready to serve another slice. The cheesecake itself will be perfectly fine.
For longer storage, you can freeze individual slices. This is actually genius for portion control or for having a fancy dessert ready whenever you want one. Cut the cheesecake into slices, place them on a parchment-lined baking sheet, and freeze until solid. Then wrap each slice individually in plastic wrap and store them all in a freezer bag. They’ll keep for up to a month. To thaw, just move a slice to the fridge a few hours before you want to eat it.
I don’t recommend leaving this cheesecake out at room temperature for more than two hours. The cream cheese base can start to get a little soft and lose its shape, and nobody wants a droopy cheesecake. If you’re serving it at a party, you can let it sit out for the duration of the meal, but pop it back in the fridge as soon as possible. The cool temperature is part of what makes the texture so perfect.
One trick I use when I know I’ll have leftovers is to cut the cheesecake into slices before storing it. This way, people can grab a piece whenever they want without having to cut into the whole thing. I put each slice on a small plate or in a container, and they’re ready to go. My family loves this setup because it means easy access to cheesecake for breakfast. Yes, breakfast. Don’t judge.
8) Try these Dessert next!


9) Lemon Cheesecake
Creamy Lemon Cheesecake Recipe: A Tangy Twist on Classic Dessert
Ingredients
For the Crust
- 200g butter, melted
- 200g tea biscuits (or graham crackers), finely ground
For the Cheesecake Filling
- 750g cream cheese, at room temperature
- 200g crème fraîche (or sour cream)
- 3g lemon zest (about 1 lemon)
- 20ml fresh lemon juice
- 125g granulated sugar
- 35g cornstarch
- 3 large eggs
For the Filling Swirl
- 125g lemon curd
For the Topping
- 100g white chocolate, chopped
- 40ml heavy cream
- 35g lemon curd
For Garnishing
- Whipped cream
- Fresh lemon slices
- Fresh mint leaves
Instructions
- Start by mixing the melted butter with your finely ground tea biscuits until everything comes together like wet sand. Press this mixture firmly into the bottom of a lined 24cm springform pan. Pop it in the fridge while you make the filling.
- In a large bowl, beat the cream cheese, crème fraîche, lemon zest, lemon juice, sugar, and cornstarch until you get a really smooth mixture. No lumps allowed here! Now gently fold in the eggs one at a time using a spatula. Don’t overmix or your cheesecake might crack.
- Pour half of your filling over the chilled crust. Now comes the fun part: drop spoonfuls of lemon curd on top and use a knife or skewer to create pretty swirls. Pour the rest of the filling over this and smooth out the top.
- Preheat your oven to 125°C (257°F). Bake the cheesecake for about 60 to 65 minutes. The center should still have a slight jiggle when you shake the pan gently. Turn off the oven and leave the cheesecake inside for another hour with the door closed. This helps prevent those annoying cracks.
- While the cheesecake cools, make your white chocolate topping. Heat the heavy cream until it’s just about to boil, then pour it over the chopped white chocolate. Let it sit for a minute, then stir until silky smooth. Mix in the lemon curd.
- Once your cheesecake has cooled completely, spread the white chocolate topping over it. You can create decorative swirls with extra lemon curd if you’re feeling fancy.
- Cover and refrigerate for at least 4 hours, but overnight is better if you can wait that long. When ready to serve, garnish with whipped cream, thin lemon slices, and fresh mint leaves. Use a warm knife (dip it in hot water and wipe dry between cuts) for clean slices.
10) Nutrition
Serving Size: 1 slice (1/12 of cheesecake), Calories: 445, Sugar: 24 g, Sodium: 320 mg, Fat: 32 g, Saturated Fat: 19 g, Carbohydrates: 34 g, Fiber: 0.5 g, Protein: 7 g, Cholesterol: 135 mg


Leave a Comment