
I’m kind of obsessed with these scones recipe right now. Like, I actually went out and bought bananas just so they could sit on my counter and get all brown and spotty. Who does that? But here’s the thing: these aren’t your regular scones. They’ve got all that cozy banana bread flavor packed into tender, flaky pastry. We’re talking real banana chunks, warm cinnamon, just a touch of nutmeg, and this ridiculously good brown sugar glaze drizzled on top. They’re perfect with your morning coffee or as an afternoon pick me up when you need something sweet but not too sweet. The best part? You can customize them just like you would other scones. Want to try a cheese scones recipe twist? Go for it. Love that cinnamon scones recipe vibe? Add more cinnamon. Craving chocolate scones recipe decadence? Toss in some chips. There’s even room to play with lemon scones recipe brightness or sourdough scones recipe tang if you’re feeling adventurous. And if you’re into fruit scones recipe variations, well, bananas are fruit, right? So we’re already there.
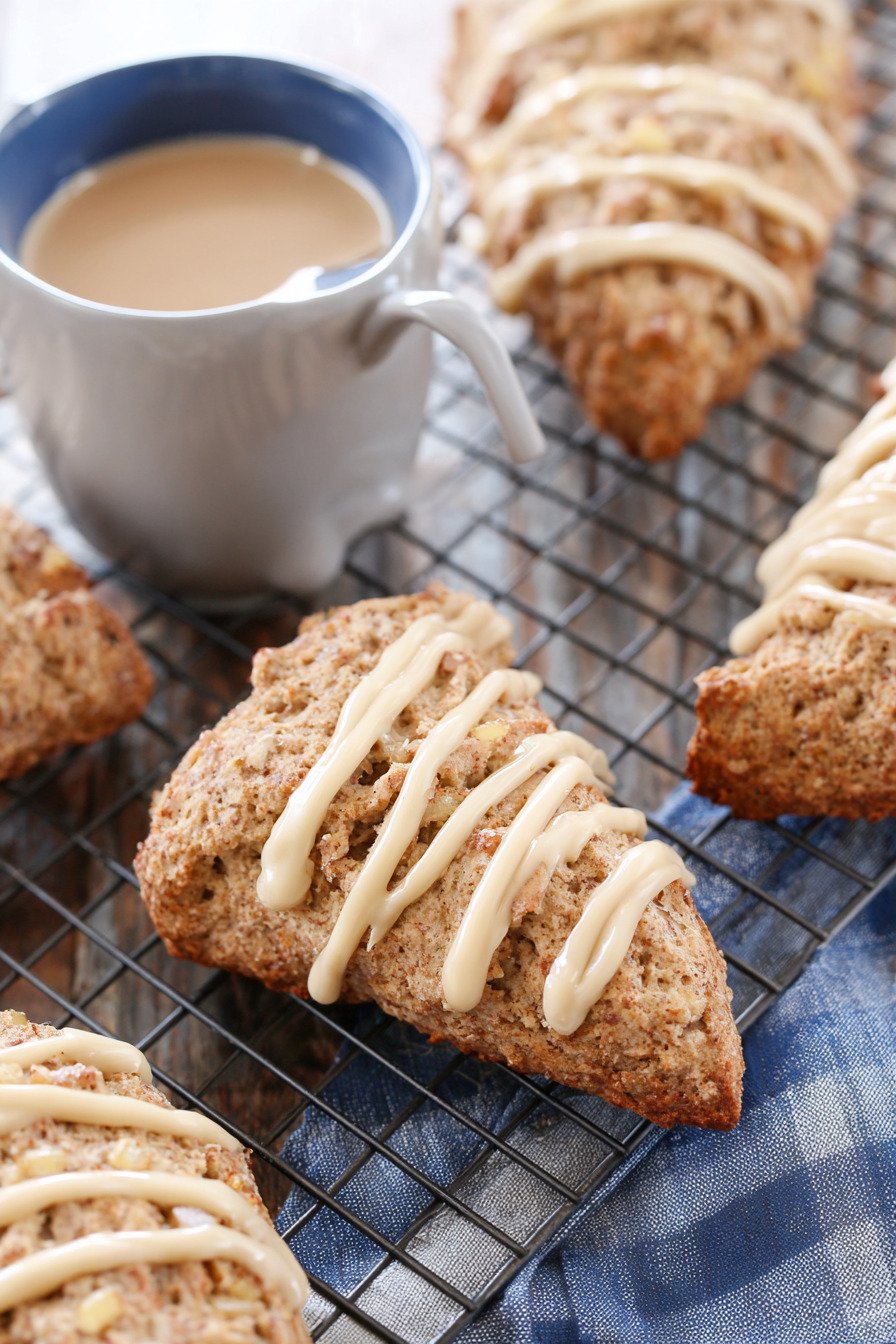
Table of Contents
- 1) Key Takeaways
- 2) Easy Banana Bread Scones Recipe
- 3) Ingredients for Banana Bread Scones
- 4) How to Make Banana Bread Scones
- 5) Tips for Making Banana Bread Scones
- 6) Making Banana Bread Scones Ahead of Time
- 7) Storing Leftover Banana Bread Scones
- 8) Try these Breakfast recipes next!
- 9) Banana Bread Scones
- 10) Nutrition
1) Key Takeaways
- What makes banana bread scones different from regular scones?
- Can you make scones with overripe bananas?
- How do you keep scones moist and tender?
- What’s the secret to flaky, delicious scones?

2) Easy Banana Bread Scones Recipe
Listen, I’m gonna be straight with you. This scones recipe changed my entire morning routine. I used to think scones were these dry, boring things you only ate when there was nothing else at the coffee shop. Boy, was I wrong.
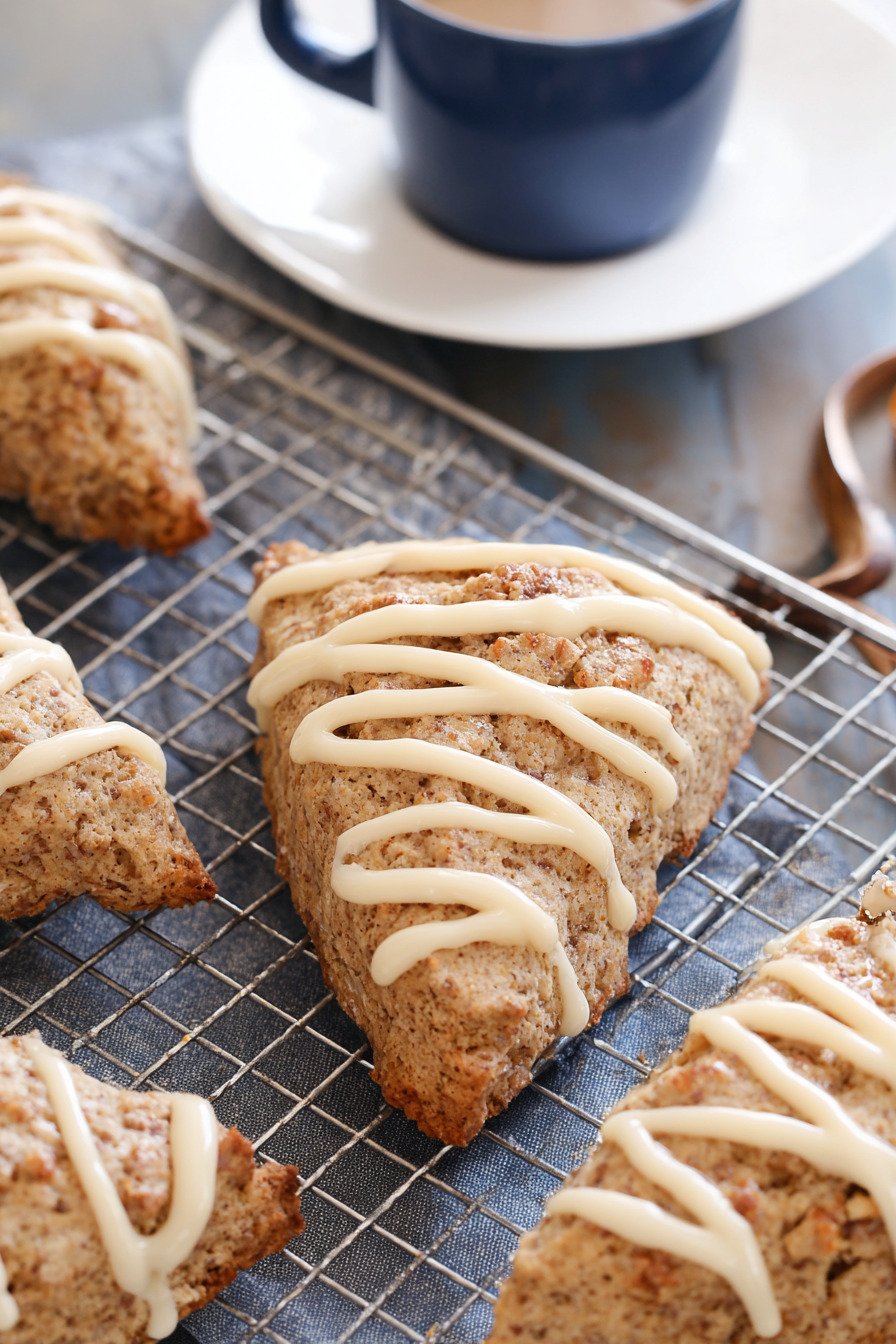
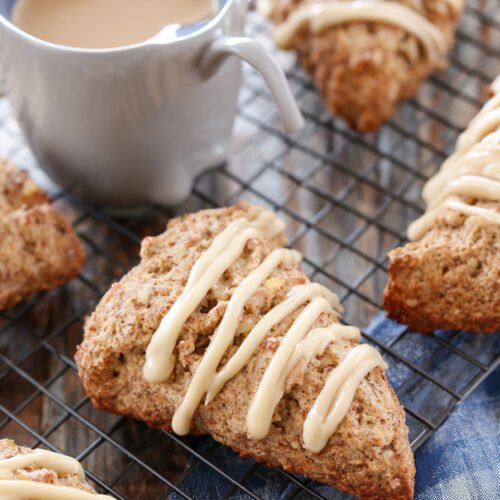
These banana bread scones are like if your favorite banana bread and a tender, buttery scone had a baby. And that baby was delicious. They’ve got chunks of real banana running through them, warm cinnamon that makes your kitchen smell like heaven, and this brown sugar glaze that’s just sweet enough without being cloying.
What I love most is how forgiving this scones recipe is. You don’t need fancy equipment or years of baking experience. If you can mash a banana and cut butter into flour, you’re golden. The dough comes together in about 15 minutes, bakes in under 20, and you’ve got eight perfect scones ready to go.
They’re soft where they should be soft, with just a tiny bit of crispness on the outside. The banana flavor really shines through without being overwhelming. And that cinnamon sugar topping? Chef’s kiss. It creates this delicate crust that cracks when you bite into it.
Here’s the best part: you can make these on a lazy Sunday morning when you’ve got time, or you can prep the dough the night before and bake them fresh when you wake up. Either way, you’re winning. They’re perfect with coffee, tea, or just eaten straight off the cooling rack when you can’t wait another second.
I’ve made variations of this dozens of times now. Sometimes I add chocolate chips (game changer). Sometimes I skip the glaze when I’m feeling less indulgent. But the base recipe? It’s rock solid every single time.
3) Ingredients for Banana Bread Scones
White Whole Wheat Flour and All Purpose Flour: We’re using a combo here, and there’s a good reason for it. The whole wheat flour gives you that hearty, nutty flavor that reminds you of actual banana bread. The all purpose flour keeps things tender. If you only have all purpose, go ahead and use it. You’ll just need to flour your surface really well when you’re shaping the dough since it’ll be stickier.
Brown Sugar: This isn’t just sweetener. Brown sugar brings moisture and that deep, caramel flavor that makes these scones taste expensive. White sugar works in a pinch, but you’ll miss that richness. I’ve tried it both ways, and brown sugar wins every time.
Baking Powder and Baking Soda: Your leavening dream team. The baking powder gives you lift, the baking soda reacts with the acidity in the bananas to create extra rise and help with browning. Don’t skip either one, and make sure they’re fresh. Old leaveners mean flat scones, and nobody wants that.
Cinnamon and Nutmeg: These warm spices make everything smell and taste like fall, even in July. The cinnamon is the star, but that little bit of nutmeg adds depth you didn’t know you needed. Some people think nutmeg is only for eggnog, but those people are missing out on proper baked goods.
Cold Unsalted Butter: This is where the magic happens. Cold butter is what creates those flaky layers in your scones. When it melts in the oven, it leaves little pockets of steam that make everything tender and delicious. Keep it in the fridge until the last possible second, and cut it into small pieces before you start. Room temperature butter will give you hockey pucks instead of scones.
Ripe Bananas: The riper, the better. Those brown spotted bananas everyone throws away? That’s what you want. They’re sweeter, easier to mash, and have way more banana flavor. I like leaving some chunks in there when I mash them. Gives you little pockets of concentrated banana goodness when you bite into the scone.
Egg: One egg binds everything together and adds richness. Lightly beaten is key here. You’re not making scrambled eggs, you just want it mixed enough to combine with the other wet ingredients easily.
Cinnamon Sugar Topping: A tablespoon of water, two tablespoons of sugar, and a quarter teaspoon of cinnamon. You brush the water on top of your shaped dough, then sprinkle this mixture over it. It creates this beautiful, sparkly crust that’s slightly crunchy and super flavorful. Don’t skip this step even if you’re in a hurry.
Brown Sugar Glaze: Confectioner’s sugar, brown sugar, vanilla, and a splash of milk. This glaze is optional but highly recommended. It adds just enough sweetness without making the scones taste like dessert. The brown sugar in the glaze echoes the brown sugar in the scones, tying everything together beautifully. Mix it thin enough to drizzle but thick enough to not just run off completely.

4) How to Make Banana Bread Scones
Step 1: Get your oven heating to 350°F and line a baking sheet with parchment paper. Don’t skip the parchment. These scones have sugar in them and they will stick to a bare pan. I learned this the hard way and had to chisel my first batch off the sheet. Not fun.
Step 2: Grab your biggest mixing bowl and whisk together both flours, the brown sugar, baking powder, baking soda, salt, cinnamon, and nutmeg. Make sure everything’s really well combined. You don’t want bites of scone that are just flour or just cinnamon. Whisk it for a good 30 seconds to get everything evenly distributed.
Step 3: Now for the fun part. Take your cold butter pieces and cut them into the flour mixture. You can use a pastry blender if you have one, or two forks if you don’t. Work it until the mixture looks like coarse crumbs. Some pieces of butter should be pea sized, some smaller. This takes a few minutes. Your hands will get tired. That’s normal. The goal is to coat those butter pieces in flour so they create flaky layers when they melt in the oven.
Step 4: Add your mashed bananas and beaten egg to the bowl. Stir everything together with a wooden spoon or spatula. At first it’s gonna look dry and you’ll think you messed up. You didn’t. Keep stirring just until everything comes together. Don’t overmix or you’ll develop the gluten too much and end up with tough scones. We want tender here.
Step 5: Dump the whole shaggy mess onto a really well floured surface. And I mean really well floured. This dough is soft and sticky, which is what makes the scones so tender, but it means you need flour to work with it. Knead the dough about 5 or 6 times. Just fold it over on itself a few times until it holds together in a cohesive mass. Don’t knead it like bread dough. We’re not trying to develop gluten here.
Step 6: Pat the dough into a circle that’s about 8 inches across. It doesn’t have to be perfect. Rustic is fine. Brush the top with water, then mix your cinnamon and sugar together and sprinkle it all over the top. Get it everywhere. This is what creates that beautiful sparkly crust.
Step 7: Cut the circle into 8 wedges like you’re cutting a pizza. A bench scraper works great for this, but a sharp knife is fine too. Transfer the wedges to your prepared baking sheet, spacing them out a bit. They don’t spread much, but give them a little room.
Step 8: Slide them into the oven and bake for 15 to 18 minutes. You’re looking for light golden brown on the edges and bottoms. Don’t overbake them or they’ll be dry. Take them out when they’re just turning golden and let them finish cooking on the pan for a minute before moving them to a cooling rack.
Step 9: Let the scones cool completely before you glaze them. I know waiting is hard, but if you glaze warm scones, the glaze will just melt and run off. For the glaze, whisk together your confectioner’s sugar and brown sugar, then add the vanilla and 2 teaspoons of milk. Whisk until smooth. Add more milk if you want it thinner. Drizzle it over the cooled scones in whatever pattern makes you happy. Let the glaze set for a few minutes, then dig in.
5) Tips for Making Banana Bread Scones
Keep your butter cold. This is the number one rule of scone making. If your butter starts to melt before the scones go in the oven, you won’t get those flaky layers. I keep mine in the fridge until the last second, and sometimes I even pop the whole bowl in the fridge for 10 minutes after cutting in the butter if my kitchen is warm.
Don’t be afraid of the dry looking dough at first. Every single time I make this scones recipe, I panic when I first mix it together. It looks way too dry. But when you turn it out and start kneading, the moisture from the bananas works its way through and everything comes together. Trust the process.
Use really ripe bananas. Like, the ones you’d normally throw away because they’re too brown. Those are perfect for this. They mash easier, they’re sweeter, and they have way more banana flavor than firm yellow ones. If your bananas aren’t ripe enough, you can speed things up by putting them in a paper bag or baking them in their skins at 300°F for about 15 minutes.
Flour your work surface generously. This dough is sticky, and that’s a good thing for tender scones, but it means you need plenty of flour to work with it. Don’t be shy. You can always brush off excess flour before baking.
Don’t overwork the dough. I see people kneading scone dough like they’re making bread, and then they wonder why their scones are tough. You want to handle this dough as little as possible. Just enough to bring it together, shape it, and cut it. The less you mess with it, the more tender your scones will be.
A bench scraper is your best friend for cutting and moving these scones. It gives you clean cuts and makes it easy to transfer the wedges to your baking sheet without them falling apart. If you don’t have one, a large knife works fine, but I really recommend getting a bench scraper if you bake regularly. They’re cheap and super useful.
Watch your baking time carefully. These scones go from perfectly golden to overdone really fast. Start checking at 15 minutes. You want them just turning golden on the edges. They’ll continue cooking a bit on the hot pan after you take them out of the oven.
Let them cool before glazing. I know I already said this, but it’s worth repeating. Hot scones will melt your glaze and turn it into a weird syrup that runs off instead of staying on top where it belongs. Be patient.
6) Making Banana Bread Scones Ahead of Time
These scones are perfect for making ahead, which is great news for busy mornings or if you’re planning to serve them for brunch. I’ve tested every possible make ahead method, and here’s what actually works.
You can make the dough the night before, shape it into the circle, cut it into wedges, and store them in the fridge on the baking sheet covered with plastic wrap. In the morning, just pull them out, let them sit at room temperature for about 10 minutes while your oven preheats, brush with water, add the cinnamon sugar, and bake. They take maybe 2 minutes longer to bake when they’re cold from the fridge, but that’s it.
You can freeze them too. Shape and cut the scones, freeze them on the baking sheet until solid (about an hour), then transfer to a freezer bag. They keep for about 2 months. Bake them straight from frozen, just add 3 to 5 minutes to the baking time. No need to thaw them first.
If you want to freeze them already baked, skip the glaze. Bake the scones, let them cool completely, then freeze in an airtight container with parchment paper between layers so they don’t stick together. When you’re ready to eat them, thaw at room temperature or warm them in a 300°F oven for about 5 minutes. Make the glaze fresh and drizzle it on right before serving.
You can prep your dry ingredients ahead too. Mix the flours, brown sugar, baking powder, baking soda, salt, and spices in a bowl or jar, cover it tightly, and store at room temperature for up to a week. When you’re ready to bake, just cut in the cold butter, add the wet ingredients, and you’re good to go. This saves you maybe 5 minutes, but when you’re half asleep at 6am, every minute counts.
The cinnamon sugar topping can be mixed and stored in a small jar indefinitely. Same with the glaze ingredients if you measure them out ahead. Just don’t add the milk to the glaze until you’re ready to use it.
One thing I don’t recommend is baking these more than a day in advance and leaving them at room temperature. They dry out faster than you’d expect. If you need to bake them more than a day ahead, freeze them and refresh them in the oven before serving.
7) Storing Leftover Banana Bread Scones
Leftover scones (if there are any, which is rare in my house) keep pretty well if you store them right. The key is not sealing them up too tight. Scones are best when they maintain a little bit of that exterior crispness, and if you seal them in an airtight container, they get soft all over.
I store mine in a container with a loosely fitting lid or a paper bag at room temperature. They’re good for about 2 days this way. After that, they start to get stale. You can refresh them by warming them in a 300°F oven for about 5 minutes. It brings back some of that just baked texture.
If you want to keep them longer, freeze them. Wrap each scone individually in plastic wrap, then put all of them in a freezer bag. They’ll keep for about 2 months frozen. To reheat, unwrap them and let them thaw at room temperature for about an hour, or warm them straight from frozen in a 325°F oven for 10 to 12 minutes.
The glaze can get a little sticky if the scones sit around for a day or two, but that’s just how glazes work. If it bothers you, skip the glaze when you first bake them and add it fresh right before serving. Or just make a little extra glaze and drizzle more on top of leftover scones before you eat them.
If your scones do get a little dry (it happens), they’re perfect split in half and toasted. Slather them with butter or cream cheese and you’ve got yourself a really good breakfast. They’re great dunked in coffee too. No shame in my dunking game.
One weird tip that actually works: if you’re storing scones overnight, put a piece of bread in the container with them. The bread goes stale and the scones stay fresh. Something about moisture transfer. I learned this from my grandmother and I thought she was crazy, but it totally works.
8) Try these Breakfast recipes next!


9) Banana Bread Scones
Banana Bread Scones Recipe with Brown Sugar Glaze
Ingredients
For the Scones
- 1 cup white whole wheat flour
- 1 1/4 cups all purpose flour
- 1/3 cup brown sugar
- 1 teaspoon baking powder
- 1/2 teaspoon baking soda
- 1/2 teaspoon salt
- 1 1/2 teaspoons cinnamon
- 1/2 teaspoon nutmeg
- 1/2 cup unsalted butter, cold and cut into pieces
- 2 ripe bananas, about 1 cup mashed
- 1 egg, lightly beaten
For the Cinnamon Sugar Topping
- 1 tablespoon water
- 2 tablespoons sugar
- 1/4 teaspoon cinnamon
For the Brown Sugar Glaze
- 1/2 cup confectioner’s sugar
- 2 tablespoons brown sugar
- 1/2 teaspoon vanilla extract
- 2 to 3 teaspoons milk
Instructions
- Get your oven going at 350°F and line a baking sheet with parchment paper.
- Grab a big bowl and whisk together both flours, brown sugar, baking powder, baking soda, salt, cinnamon, and nutmeg.
- Now for the fun part: cut that cold butter into the flour mix using a pastry blender or two forks until it looks like coarse crumbs. Don’t rush this step.
- Stir in your mashed bananas and egg. Mix just until everything comes together. The dough’s gonna look dry at first, but trust me on this.
- Dump the dough onto a really well floured surface. It’ll be soft and a bit sticky, which is totally normal. Knead it about 5 or 6 times until it holds together. Don’t overwork it or you’ll end up with tough scones.
- Pat the dough into an 8 inch circle. Brush the top with water, then mix your topping sugar and cinnamon together and sprinkle it all over.
- Cut into 8 wedges and space them out on your baking sheet.
- Bake for 15 to 18 minutes until they’re light golden brown. Let them cool on a wire rack.
- While they’re cooling, whisk together both sugars for the glaze. Add vanilla and 2 teaspoons of milk. Want it thinner? Add another teaspoon of milk. Drizzle over cooled scones and try not to eat them all at once.
- Store any leftovers in a loosely covered container, though honestly they probably won’t last that long.
10) Nutrition
Serving Size: 1 scone, Calories: 285, Sugar: 18 g, Sodium: 245 mg, Fat: 12 g, Saturated Fat: 7 g, Carbohydrates: 41 g, Fiber: 2 g, Protein: 4 g, Cholesterol: 50 mg


Leave a Comment