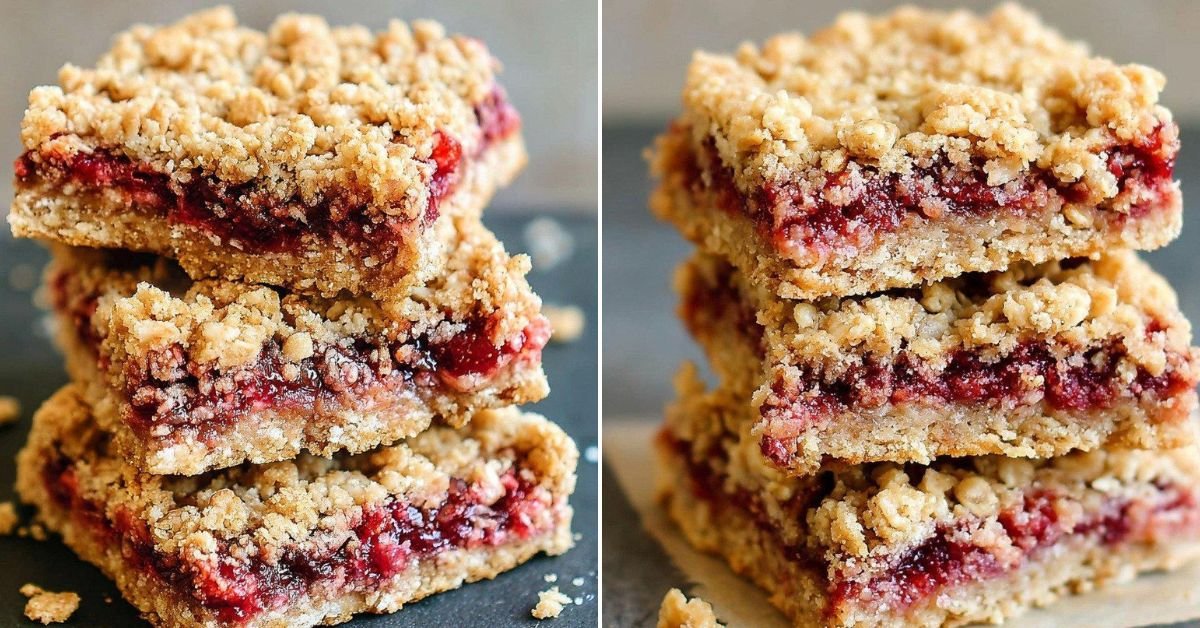
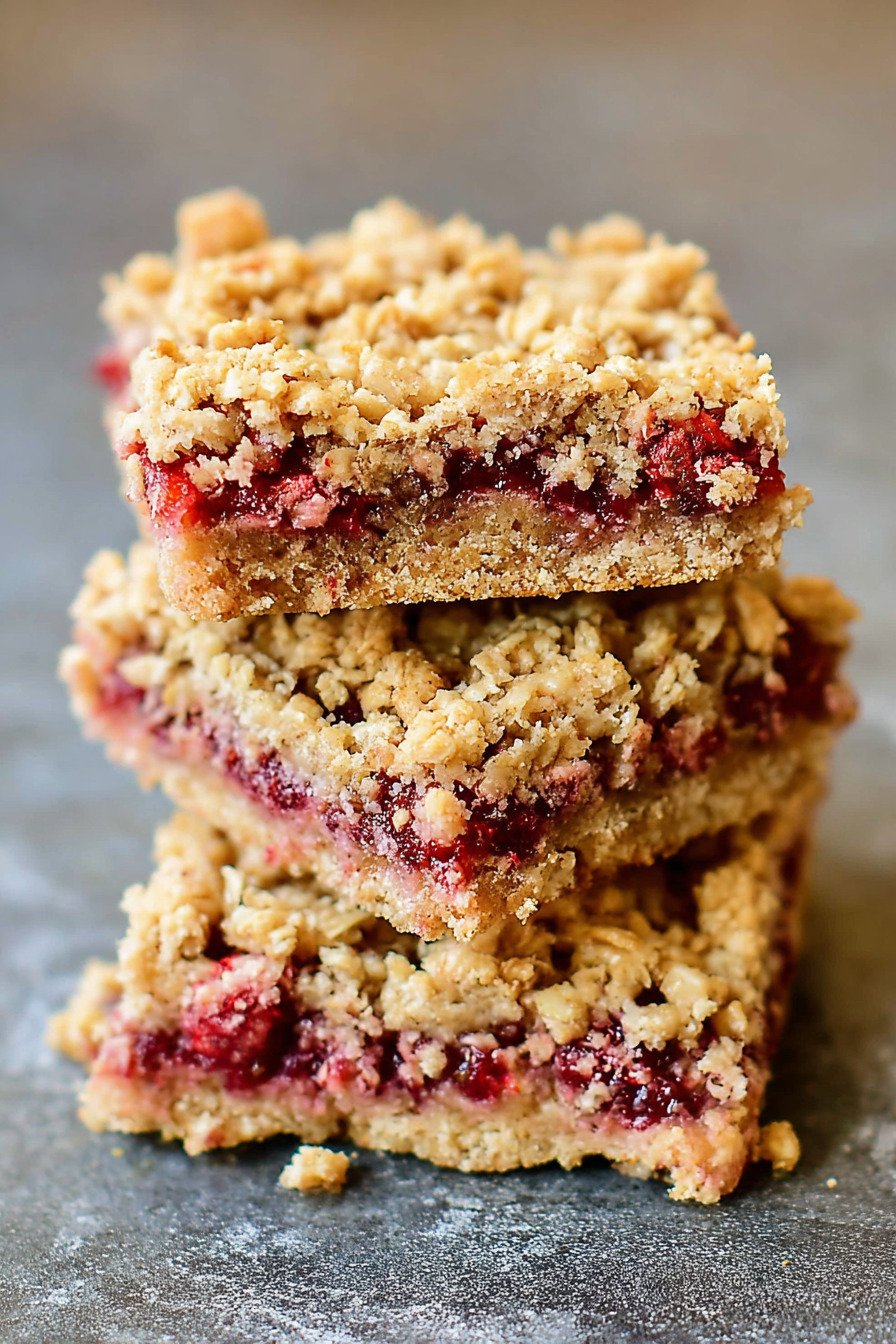
You know those mornings when you need something fast but don’t want to compromise on taste? That’s exactly why I fell in love with these berry oat bars. They’ve become our family’s go-to for busy weekday mornings and lazy weekend brunches alike.nnWhat makes these bars special is how simple they are to throw together. We’re talking one bowl, maybe ten minutes of actual work, and you’ve got yourself a week’s worth of quick snack recipes that everyone will love. No fancy equipment needed. Just mix everything up, press it into a pan, and let the oven do its magic.nnI love using raspberry preserves, but honestly? Use whatever you’ve got in your fridge. Strawberry, blueberry, even that fancy apricot jam you’ve been saving. These bars don’t judge. The oat mixture gets this perfect crumbly texture that somehow holds together just right. Sweet enough to feel like a treat but not so sugary that you feel guilty grabbing one after school. Trust me, I’ve tested this recipe more times than I can count, and every single batch disappears faster than I can cut them into squares.
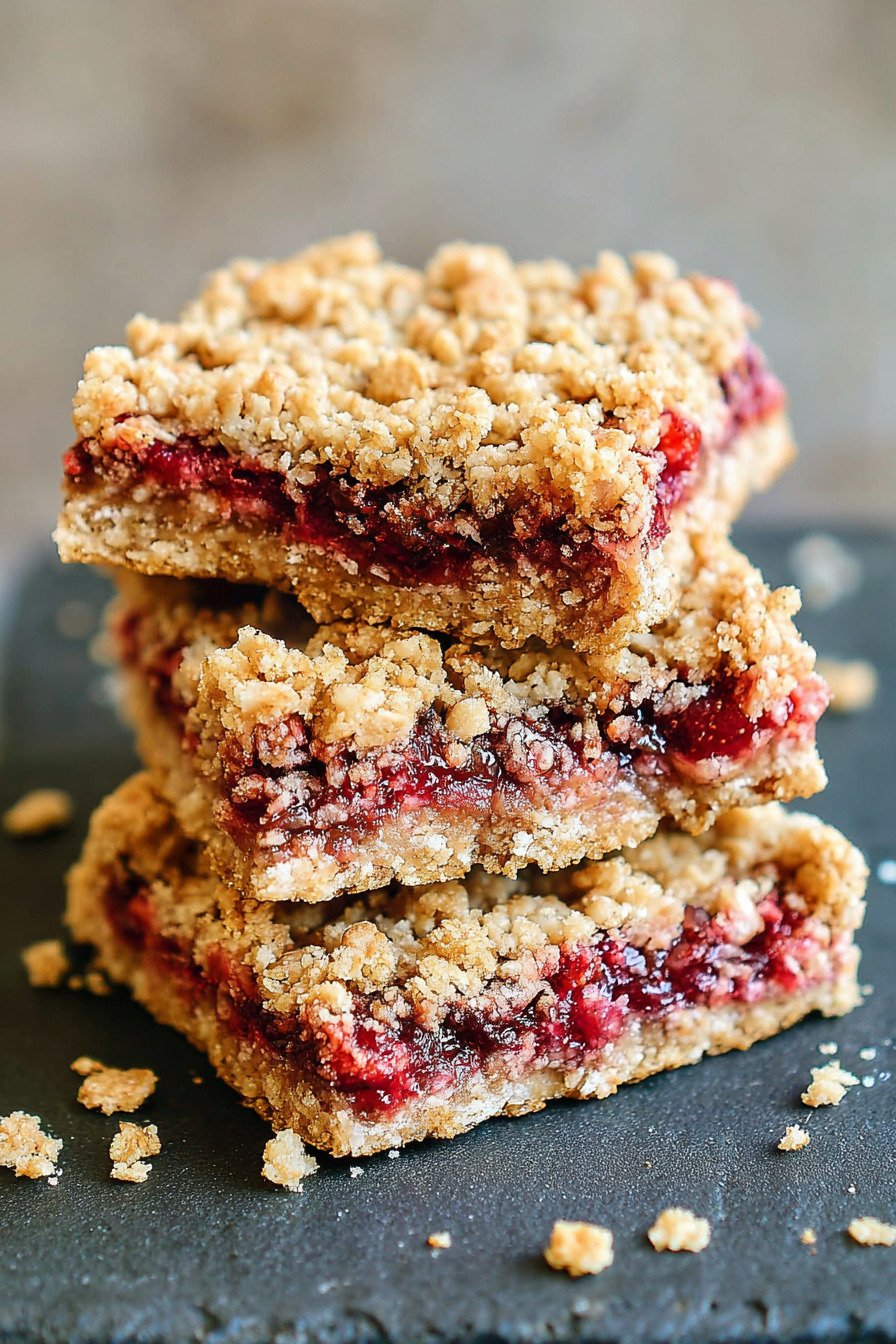
Table of Contents
- 1) Key Takeaways
- 2) Easy Berry Oat Bars Recipe
- 3) Ingredients for Berry Oat Bars
- 4) How to Make Berry Oat Bars
- 5) Tips for Making Berry Oat Bars
- 6) Making Berry Oat Bars Ahead of Time
- 7) Storing Leftover Berry Oat Bars
- 8) Try these Snacks next!
- 9) Berry Oat Bars Recipe
- 10) Nutrition
1) Key Takeaways
- What makes berry oat bars a perfect quick snack recipe?
- Can you make these bars ahead for after school snacks?
- How do you keep oat bars from falling apart?
- What’s the best way to store homemade berry bars?

2) Easy Berry Oat Bars Recipe
Quick snack recipes don’t get much simpler than these berry oat bars, and I mean that in the best possible way. We’re talking about throwing everything into one bowl, pressing it into a pan, and letting the oven work its magic. No stand mixer required. No complicated techniques. Just straightforward baking that delivers incredible results every single time.
Quick snack recipes like these are lifesavers on hectic mornings when you need something substantial but don’t have time to fuss. I started making these when my kids were younger and constantly raiding the pantry for after school snacks. They wanted something sweet, I wanted something that wasn’t pure sugar, and these bars became our happy compromise. The best part? They actually ask for them now, which is saying something.
The genius of this recipe lies in its flexibility. Got raspberry preserves? Perfect. Only have strawberry or blackberry? That works too. The oat mixture creates this beautiful crumbly base that somehow holds together just right when you bite into it. Sweet enough to satisfy that mid-afternoon craving but not so sugary that you crash an hour later. My neighbor tried these last month and now she makes a batch every Sunday for her family’s breakfast meal prep.
What I love most is how forgiving these bars are. Forgot to set a timer? They’re pretty hard to overbake. Pressed the bottom layer a little thin? Still delicious. Used old-fashioned oats instead of quick oats? Totally fine. They’re the kind of recipe that builds your confidence in the kitchen because they turn out great no matter what.
3) Ingredients for Berry Oat Bars
Coconut Oil
Melted coconut oil gives these bars their tender, crumbly texture that just melts in your mouth. I use refined coconut oil so there’s no coconut taste competing with the berries. If you’re not a coconut oil person, butter works beautifully too. Just make sure whatever fat you use is fully melted and slightly cooled before mixing. Room temperature is your friend here. I learned this the hard way when I added hot melted butter once and it made everything too greasy.
All-Purpose Flour
Regular all-purpose flour creates the perfect structure for these bars. Want to make them gluten free? I’ve done that countless times for friends with celiac disease. Just swap in a good quality 1:1 gluten free flour blend. The texture stays remarkably similar. Bob’s Red Mill and King Arthur both make excellent gluten free blends that work like a charm. Just make sure your oats are certified gluten free too if you’re going that route.
Quick Oats
Quick oats give these bars their signature texture without being too chunky or obvious. I prefer quick oats over old-fashioned rolled oats for this particular recipe because they blend better into the mixture. That said, I’ve used rolled oats in a pinch and they work fine, just give you a slightly heartier, more rustic texture. Some people actually prefer that. The oats soak up moisture from the preserves and maple syrup, creating pockets of flavor throughout.
Maple Syrup
Real maple syrup is my sweetener of choice for quick snack recipes like these. It brings this warm, almost caramel-like depth that regular sugar just can’t match. Plus it’s a liquid, which helps bind everything together. I buy the big jugs from Costco and keep one in my pantry at all times. Honey works if that’s what you have, but the flavor will be noticeably different. Agave nectar is another option, though I find it a bit too sweet for my taste.
Coconut Sugar
Coconut sugar adds another layer of sweetness with a subtle molasses note. If you don’t have coconut sugar, regular granulated sugar works perfectly fine. I won’t tell anyone. Some people even use brown sugar for a deeper flavor. The sugar helps create that slightly crispy top layer that contrasts so nicely with the soft, jammy center. It’s one of those small details that makes a big difference in the final product.
Baking Powder
Just one teaspoon of baking powder gives these bars a light lift without making them cakey. You want them dense and substantial, not fluffy like a muffin. Make sure your baking powder is fresh. I keep mine in an airtight container and replace it every six months or so. Old baking powder can give your baked goods a weird metallic taste that nobody wants in their healthy snacks.
Salt
Half a teaspoon might not seem like much, but salt is what makes all the other flavors pop. It balances the sweetness and brings out the berry flavor in the preserves. I use regular table salt, but kosher salt works too if that’s your thing. Just remember that kosher salt is less dense, so you might need a tiny bit more.
Raspberry Preserves
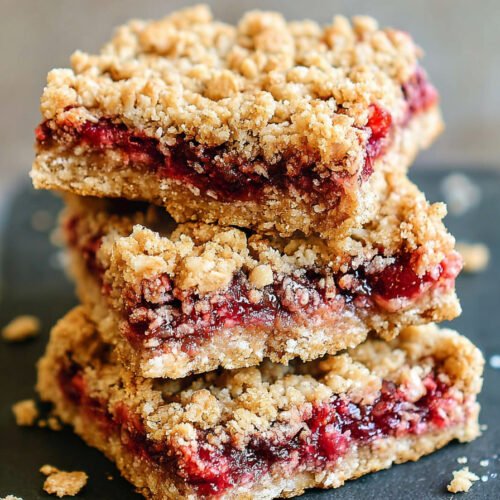
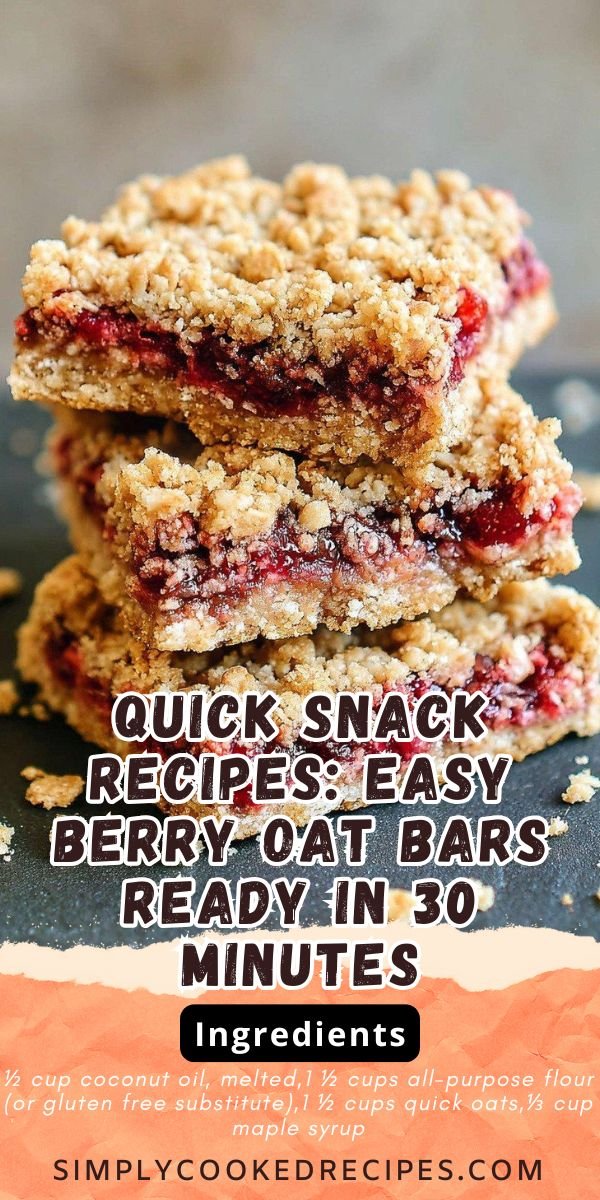
The star of the show! I love raspberry preserves for their tart sweetness and beautiful color, but this recipe is your playground. Try strawberry, blackberry, apricot, or even a mix. I once made these with a jar of homemade blueberry jam my aunt gave me, and they were incredible. Just make sure you’re using preserves or jam, not jelly. Jelly is too thin and will just seep into the oat mixture instead of creating that lovely jammy layer we’re after. Look for preserves with visible fruit chunks for the best berry tart experience.

4) How to Make Berry Oat Bars
Step 1. Prep Your Pan and Preheat
Get your oven heating to 350°F while you prep everything else. Grab an 8×8 inch baking pan and give it a good spray with non-stick cooking spray. Don’t skip this step or you’ll be chiseling bars out later. I learned that lesson exactly once. Some people like to line their pan with parchment paper for even easier removal, which is smart if you’re planning to transport these anywhere.
Step 2. Melt the Coconut Oil
Melt your coconut oil in the microwave or on the stovetop. I usually just pop it in the microwave for about 30 seconds. Let it cool for a minute or two so it’s not scorching hot. You want it liquid but not steaming. If it’s too hot, it can start cooking your other ingredients when you mix them in, which changes the texture in ways you don’t want for these 5 minute recipes.
Step 3. Mix Everything Together
Dump all your ingredients into a large bowl except the preserves. Seriously, just dump them in. Add the flour, oats, maple syrup, coconut sugar, baking powder, and salt right into that melted coconut oil. Stir everything together with a wooden spoon or spatula until you get a crumbly mixture. It should look a bit like wet sand that clumps together when you squeeze it. If it seems too dry, add a tablespoon more maple syrup. Too wet? A bit more flour or oats will fix it.
Step 4. Press the Bottom Layer
Take about two-thirds of your oat mixture and dump it into your prepared pan. Now here’s where you need to get hands-on. Use your hands or the bottom of a measuring cup to press that mixture down firmly into an even layer. Really press it. This creates a solid base that won’t fall apart when you cut the bars later. Get it as flat and even as possible. The corners can be tricky, so use your fingers to pack the mixture in there good.
Step 5. Spread the Preserves
Spoon your raspberry preserves over the pressed oat layer. Here’s a tip I wish someone had told me the first time I made these balanced meals: leave about half an inch of space around the edges. If the preserves touch the sides of the pan, they’ll caramelize and burn, making your bars stick. Use the back of your spoon to spread the preserves evenly, but don’t stress about getting it perfect. A few bare spots are totally fine.
Step 6. Add the Crumb Topping
Take the remaining third of your oat mixture and crumble it over the top of the preserves. Don’t press this layer down as much as you did the bottom. You want it to stay crumbly and create that rustic, homemade look. Just lightly press the crumbles so they stick and don’t roll off when you slice the bars. This top layer is going to get golden and slightly crispy in the oven, creating a nice textural contrast.
Step 7. Bake Until Golden
Slide that pan into your preheated oven and bake for 25 to 30 minutes. You’re looking for the top to turn lightly golden brown and the edges to look set. The preserves might bubble up a bit around the edges, which is totally normal. Your kitchen is going to smell absolutely amazing. When they’re done, pull them out and let them cool completely in the pan. I know it’s tempting to dig in right away, but warm bars will fall apart. Let them cool for at least an hour.
Step 8. Slice and Serve
Once cooled, use a sharp knife to cut your bars into 9 equal squares. Wipe your knife clean between cuts for the neatest edges. These make perfect after school snacks, breakfast on the go, or even a simple dessert. I love grabbing one with my morning coffee. They’re sweet enough to feel indulgent but wholesome enough that I don’t feel guilty starting my day with one.
5) Tips for Making Berry Oat Bars
Press that bottom layer like you mean it. I can’t stress this enough. The firmness of your base determines whether your bars hold together or crumble into a delicious mess. Use the bottom of a measuring cup, a small glass, or just get in there with your hands. You want that layer packed down tight and completely even. Spend an extra minute on this step and you’ll thank yourself later when you’re cutting perfect squares.
Watch your preserve placement around the edges. That half-inch border I mentioned isn’t just a suggestion. Preserves that touch the pan will burn and create a sticky, bitter layer that ruins the whole experience. I learned this the hard way when I was rushing one morning and spread the jam all the way to the corners. The bars stuck so badly I practically had to chisel them out, and the edges tasted burnt. Keep that preserves away from the sides and you’ll have bars that lift right out.
Let them cool completely before cutting. I know the temptation to slice into warm bars straight from the oven is real. They smell incredible and you’re hungry and impatient. But warm bars will absolutely fall apart. The preserves need time to set back up, and the oat mixture needs to firm up as it cools. Give them at least an hour, ideally two. Better yet, make them the night before and let them sit overnight. They actually taste even better the next day once all the flavors have melded together.
Don’t skip the salt. Half a teaspoon might seem insignificant, but salt is what transforms these from bland to balanced. It brightens up the sweetness from the maple syrup and sugar, makes the berry flavor more pronounced, and adds depth to the whole situation. Baking without enough salt is like leaving a painting unfinished. Everything seems slightly off even if you can’t put your finger on why.
Experiment with different preserves and combinations. Once you’ve made the basic raspberry version a few times, start playing around. Mix raspberry and blackberry. Try apricot preserves with a little almond extract added to the oat mixture. I once made these with fig preserves and they were sophisticated enough to serve at a dinner party. Strawberry preserves with a pinch of black pepper is another winning combination that sounds weird but tastes amazing.
Consider adding mix-ins to the oat layer. A handful of chopped walnuts or pecans adds nice crunch. Mini chocolate chips scattered through the mixture make these feel more dessert-like. I’ve added shredded coconut, pumpkin seeds, and even a tablespoon of chia seeds for extra nutrition. Just don’t go overboard or you’ll change the texture too much. A quarter to half cup of add-ins is plenty.
Use room temperature ingredients when possible. If your coconut oil is melted but your eggs are fridge cold, wait a few minutes to let things equalize. Extreme temperature differences can cause your mixture to seize up or separate. Everything comes together more smoothly when ingredients are around the same temperature. I usually set my coconut oil on the counter to soften while I measure out everything else.
6) Making Berry Oat Bars Ahead of Time
These bars are the ultimate make-ahead recipe, which is why they’re perfect for meal prep Sundays or when you know you’ve got a busy week coming up. I make a batch every other week and portion them out for quick breakfast grabs or afternoon pick-me-ups. They hold up beautifully in the fridge for over a week, and the flavors actually get better after a day or two of sitting.
Want to prep these the night before a brunch or breakfast gathering? Smart move. Bake them, let them cool completely, then cover the pan tightly with plastic wrap or aluminum foil. Leave them at room temperature overnight and they’ll be perfect in the morning. I do this all the time when I’m hosting breakfast. One less thing to worry about when guests are arriving.
Planning even further ahead? These bars freeze like champions. Once they’re completely cool, cut them into squares and wrap each one individually in plastic wrap. Stack them in a freezer-safe container or zip-top bag and freeze for up to three months. Pull one out the night before and let it thaw on the counter, or microwave it for about 20 seconds for a warm, fresh-baked taste. My sister keeps a stash in her freezer specifically for emergency breakfast situations.
The oat mixture can be prepared ahead too if you want to break up the work. Mix all the dry ingredients together and store them in an airtight container for up to a week. When you’re ready to bake, just melt your coconut oil, add the maple syrup, mix everything together, and proceed with the recipe. This is perfect for when you want the satisfaction of fresh-baked bars without all the measuring and mixing.
If you’re packing these for lunch boxes or taking them somewhere, wait to cut them until you’re ready to go. They stay fresher longer when kept in one piece. I learned this when I pre-cut a batch for my daughter’s soccer tournament and they dried out before halftime. Now I bring the whole pan, wrapped well, and cut them as needed. They stay soft and delicious all day long.
7) Storing Leftover Berry Oat Bars
Proper storage makes all the difference in keeping these bars fresh and delicious for days. My go-to method is lining an airtight container with paper towels, stacking the bars inside, and adding another layer of paper towels on top. The paper towels absorb any excess moisture from the preserves, preventing sogginess. Without this trick, you might notice the bars getting a bit damp on the bottom after a few days.
Room temperature storage works fine for up to five days if your kitchen isn’t too warm. I keep mine in a container on the counter and we usually demolish them within three days anyway. If your house runs hot or humid, the fridge is your better bet. Cold bars are actually pretty delicious, with a firmer, almost fudgy texture. Some people even prefer them straight from the fridge.
Speaking of the fridge, these bars will stay fresh for a solid week in there, sometimes longer. I store them in a glass container with a tight-fitting lid. Glass doesn’t absorb odors or flavors like plastic can, which means your bars won’t taste like last night’s leftovers. If you notice them drying out a bit, pop one in the microwave for 10 seconds. Brings them right back to life.
For longer storage, freezing is absolutely the way to go. I mentioned this earlier, but it bears repeating because it’s such a game changer. Individually wrapped bars stacked in a freezer container or bag will keep for three months easy. Label the container with the date so you remember when you made them. I like to write the flavor too, since I usually have multiple batches going with different preserves.
When you’re ready to eat a frozen bar, let it thaw at room temperature for about an hour. Or if you’re impatient like me, microwave it for 15 to 20 seconds. You can eat them partially frozen too, which gives you this interesting texture situation where the oat parts are soft but the preserve center is cold and thick. My kids think it’s weird, but I kind of love it on hot summer afternoons.
One more storage tip that nobody asked for but I’m sharing anyway: these bars travel really well. Pack them in your lunch, your gym bag, or your hiking backpack. They’re sturdy enough not to fall apart but tender enough to be satisfying. Just wrap them individually in parchment paper or plastic wrap to keep them fresh. Way better than any store-bought granola bar, and you know exactly what’s in them.
8) Try these Snacks next!

9) Berry Oat Bars Recipe
Quick Snack Recipes: Easy Berry Oat Bars Ready in 30 Minutes
Ingredients
- ½ cup coconut oil, melted
- 1 ½ cups all-purpose flour (or gluten free substitute)
- 1 ½ cups quick oats
- ⅓ cup maple syrup
- ⅓ cup coconut sugar (or granulated sugar)
- 1 teaspoon baking powder
- ½ teaspoon salt
- ½ cup raspberry preserves
Instructions
- Preheat your oven to 350°F. Spray an 8×8 baking pan with non-stick spray and set it aside.
- Grab a large bowl and mix all your ingredients together except for the preserves. Just dump everything in and stir until combined.
- Take about ⅔ of that crumbly mixture and press it firmly into the bottom of your prepared pan. Really get in there and make it nice and flat.
- Spread the raspberry preserves over the pressed layer, but leave about ½ inch around the edges. This keeps the jam from burning against the pan.
- Crumble the remaining ⅓ of the mixture over the top of the preserves. Give it a gentle press so those crumbles stay put after baking.
- Pop it in the oven and bake for 25 to 30 minutes, until the top turns lightly golden brown.
- Let the bars cool completely in the pan on a cooling rack. Once cooled, slice into 9 squares and enjoy!
10) Nutrition
Serving Size: 1 bar, Calories: 334, Sugar: 20 g, Sodium: 196 mg, Fat: 13 g, Saturated Fat: 11 g, Carbohydrates: 51 g, Fiber: 2 g, Protein: 4 g, Cholesterol: 0 mg


Leave a Comment